Getting Started
What’s In Box
The Fetch and Freight Research Edition robots each ship in reusable ATA cases. Inside each case you will find the robot, toolkit, and power supply for charging the robot.
Fetch and Freight
Please watch the video below for unpacking Fetch or Freight. The video covers unpacking the robot, connecting the batteries, turning on the robot, and driving the robot via the provided joystick.
Toolkit
The toolkit contains the tools, accessories, and fasteners needed to use the Fetch and Freight. The picture below shows packaged toolkit.
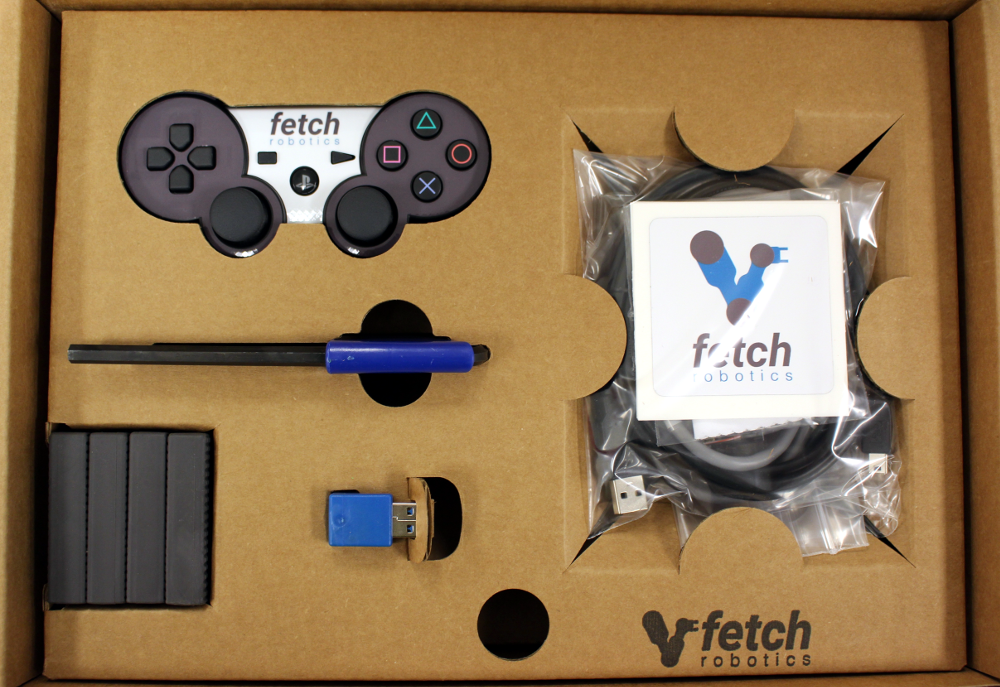
Inside the toolkit box you will find:

Item # |
Item Name |
QTY |
Purpose |
|---|---|---|---|
1 |
Metric Hex Key Set |
1 |
For removing screws and attaching accessories |
2 |
Right Angle USB Connector |
1 |
To prevent USB connector damage while driving |
3 |
Wireless Joystick |
1 |
For teleoperating the robot |
4 |
USB Cable |
1 |
For charging the wireless joystick |
5 |
Finger Tip Covers |
4 |
To replace damaged finger tips |
6 |
M5x10mm SHCS |
4 |
For attaching accessories to the base mount points |
7 |
M4x10mm SHCS |
4 |
For attaching accessories to the head mount points |
8 |
M3x14mm Standoffs |
4 |
For attaching accessories to the gripper |
9 |
3ft Ethernet Cable |
1 |
For connecting the robot to the network |
10 |
Fetch Robotics Stickers |
5 |
For your laptop :) |
11 |
Mircofiber Lens Cloth |
1 |
For cleaning optics of the robot |
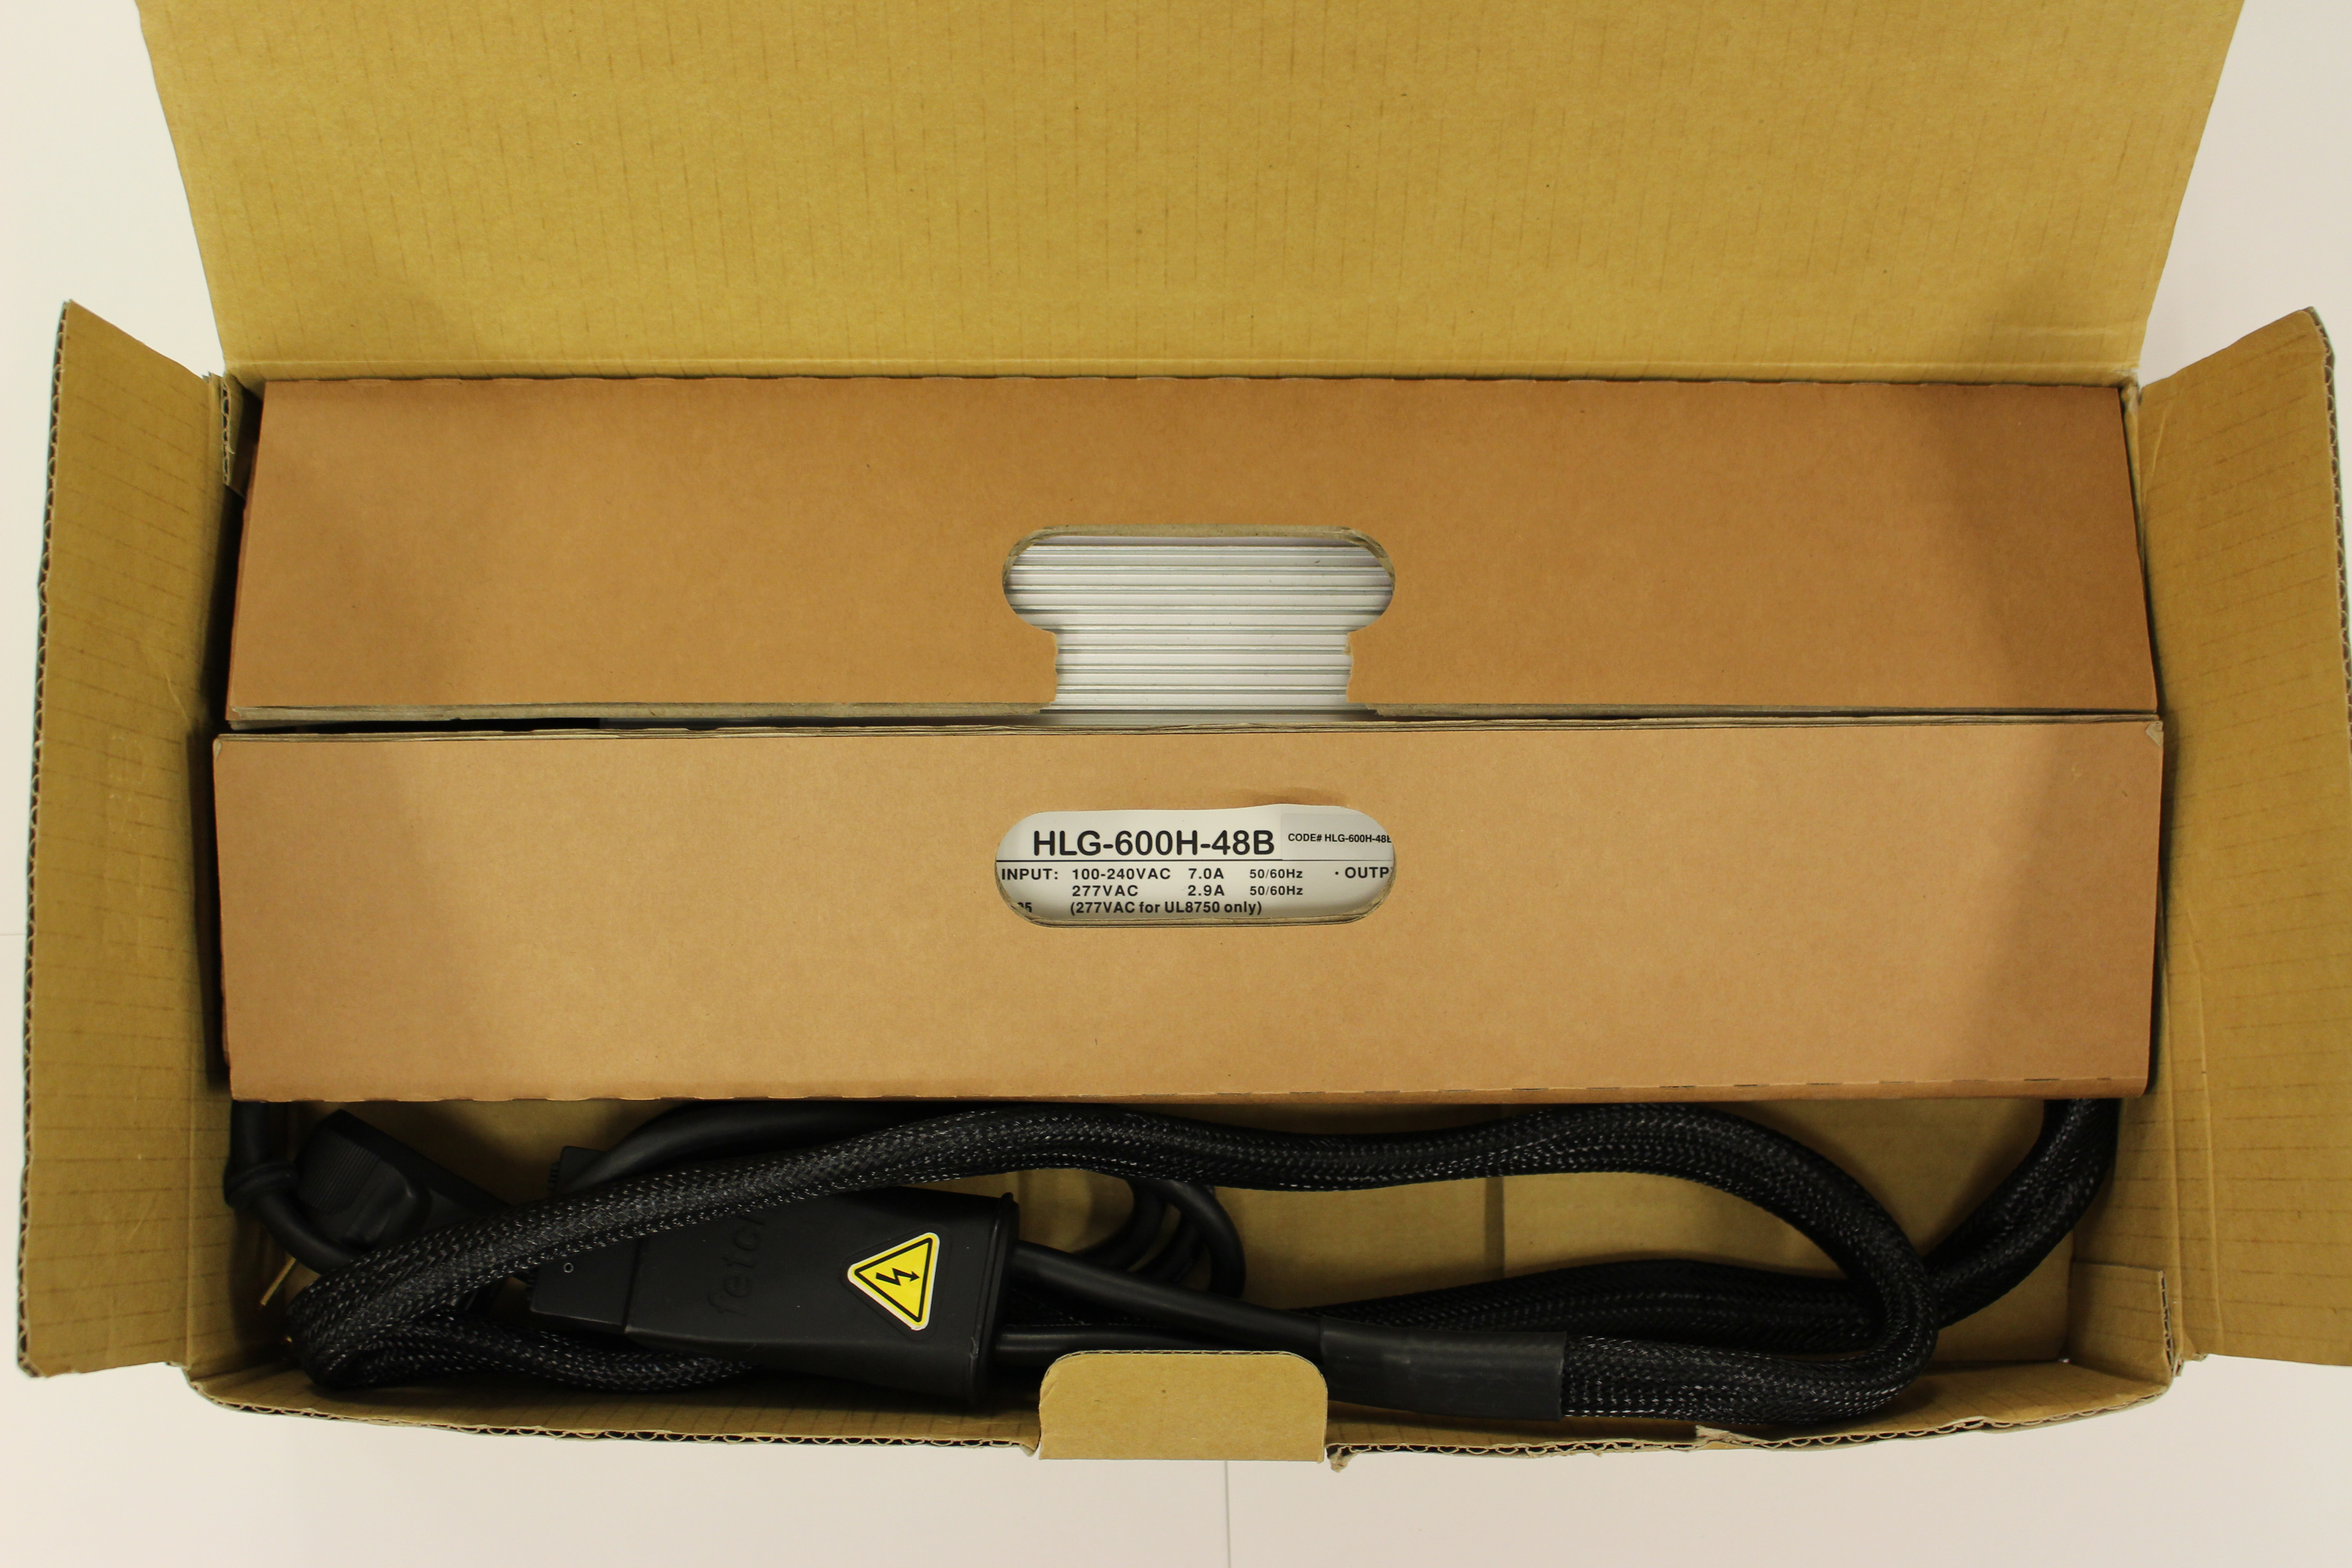
Robot Power Supply
The robot power supply is shown below in the packaging:
The robot plug end is shown below, when removing the charge plug from the robot always grab the plug by the housing and not the cable.
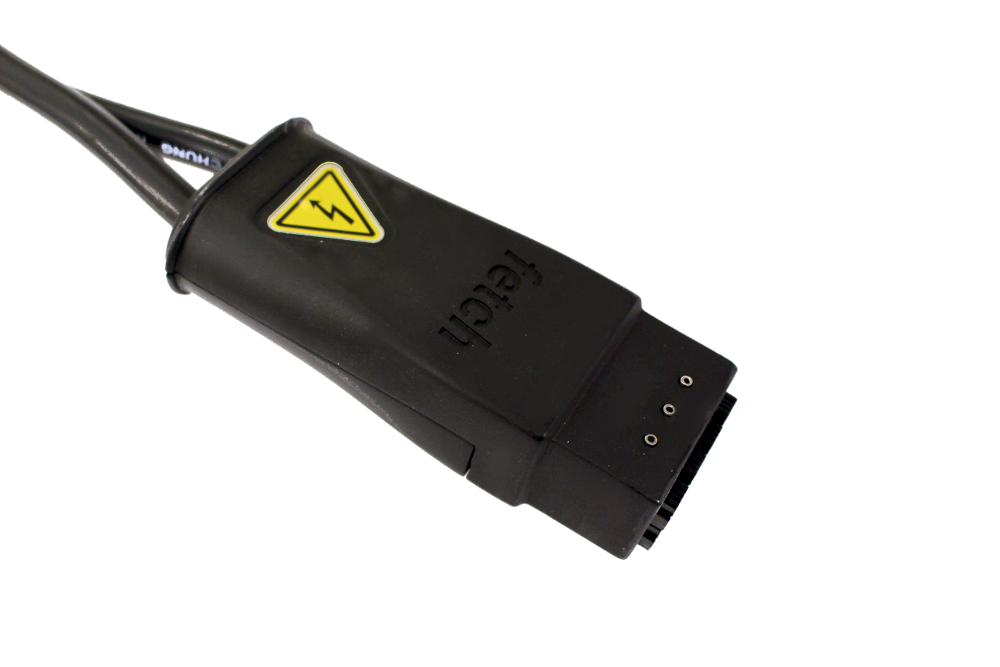
Warning
Pulling on the charge plug cable instead of the handle can cause damage to the cable assembly over time and could potentially cause injury to the robot or user.
Running Fetch and Freight
Turning on Fetch and Freight
To turn on the robot, set the Power Disconnect Switch (the red one on the lower back of the robot) to the ON position and then press the power switch on the access panel until it lights up.
Logging In
Once the robot is turned on and the robot is on the network, ssh
into the computer of the robot using the default fetch user
account:
>$ ssh fetch@<robot_name_or_ip>
robot_name_or_ip will be either an IPv4 network address, or a network name, depending
on the configuration of your local network. If your computer
and network is setup for multicast DNS (mDNS) then you may be able to use
fetchXYZ.local as the network name where XYZ will be the serial number
of your robot (remove any leading zeros from the serial number).
Connecting a Monitor (Optional)
If you are unable to access the robot through ssh due to your network settings you will need to connect an HDMI monitor, USB keyboard and USB mouse to the side panel ports. Then use them to select your network from the networking menu, it looks like an empty quarter circle pointed downward when disconnected, in the upper right hand corner of the screen. Once it is set it should remain connected through all reboots.
Warning
Monitor cables that conform to HDMI specifications will fit the robot’s monitor port. But some cheaper cables have overmolding that is too large given the spec and may not seat properly. Please ensure the HDMI cable you are using is the correct size.
Note
If you are still having difficulty connecting to your robot you will need to contact your network administrator for specific instructions on how to connect the robot to your network.
Once connected then create your user account as shown below.
Default User Account
Each robot ships with a default user account, with username fetch and password robotics. It is recommended to change the password when setting up the robot.
Creating User Accounts
It is recommended that each user create their own account on the robot, especially when developing from source. To create an account on the robot, ssh into the robot as the fetch user, and run the following commands:
> sudo adduser USERNAME
> sudo usermod -G adm,cdrom,sudo,dip,plugdev,lpadmin,sambashare USERNAME
Tucking Fetch’s Arm
Note
The tuck arm server is a new feature released in fetch_teleop and fetch_bringup 0.6.0. The deadman became required in fetch_teleop 0.7.0.
To tuck the arm, press and hold button 6, as shown in the image of the controller below, for one second. This will trigger the tuck_arm server to tuck the arm. While tucking the arm, Fetch will avoid collisions with itself, however it will not be using any active perception, so be sure to keep the space in front of the robot clear when running the tuck arm. While the arm is tucking, you will have to hold the deadman. Releasing the deadman will stop the tucking action.
Driving Fetch and Freight with a Joystick
Each Fetch and Freight ship with a robot joystick. Whenever the robot drivers are running, so is joystick teleop. The joystick is capable of controlling the movement of the robot base, torso, head and gripper.
Warning
Fetch robots use wireless controllers. As with any wireless technology, maximum range between controller and robot can vary depending on environment. You should experiment with your robot to understand the distance limit at which you can safely control your robot.
Note
If you are using the older PS3 controller a different version of this tutorial can be found here.
Note
To switch your robot to use a PS4 controller instead of a PS3 controller, see the instructions here.
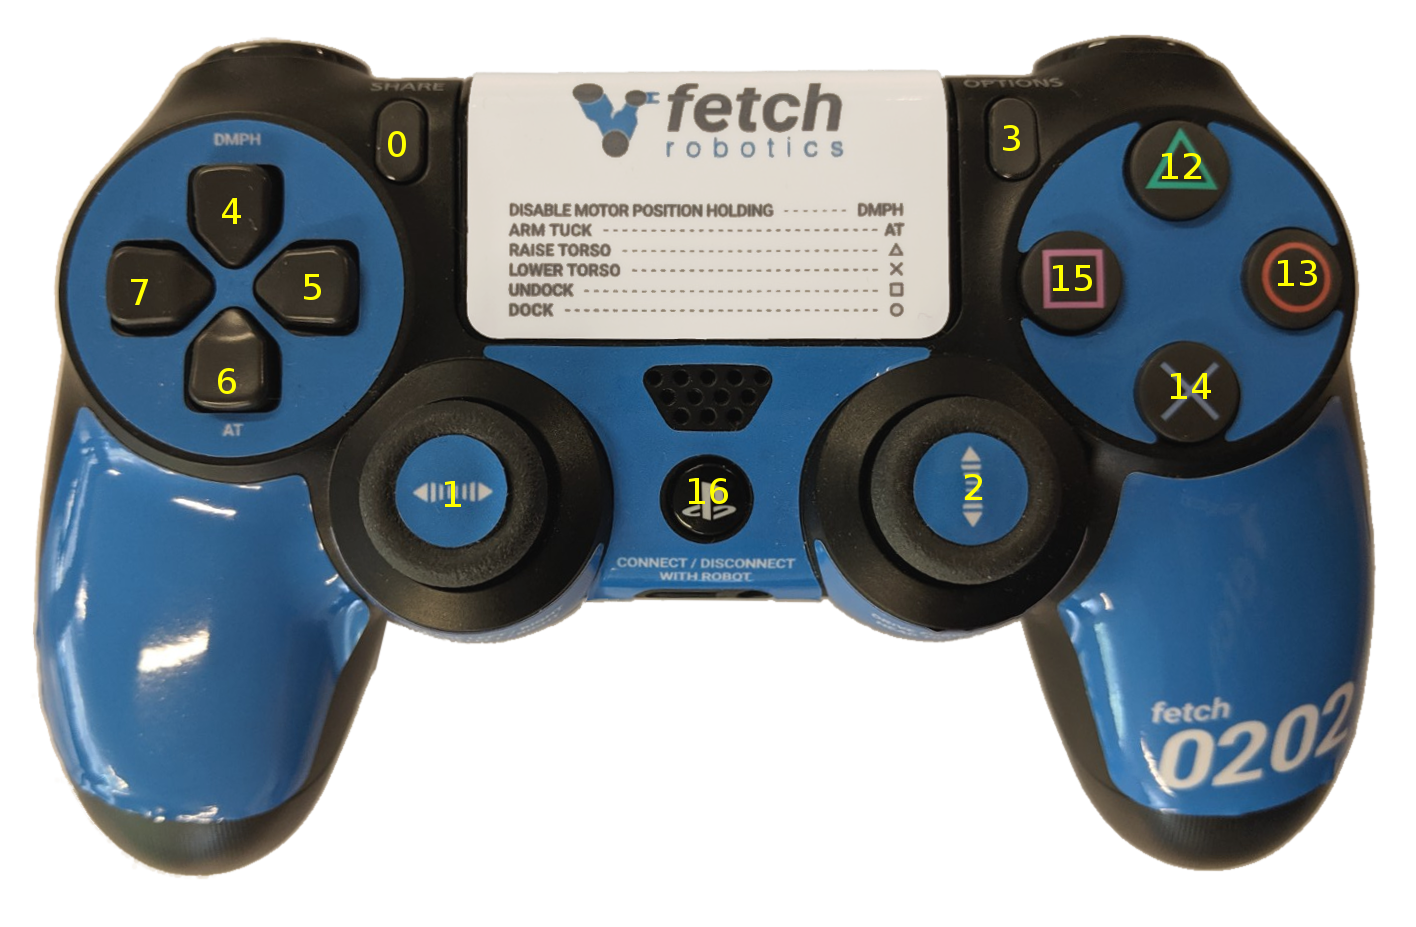
Button # |
Function (details below) |
|---|---|
0 |
Open gripper |
1 |
Control robot turning |
2 |
Control forward/backward driving |
3 |
Close gripper |
4 |
|
5 |
Not used |
6 |
Arm tuck |
7 |
Not used |
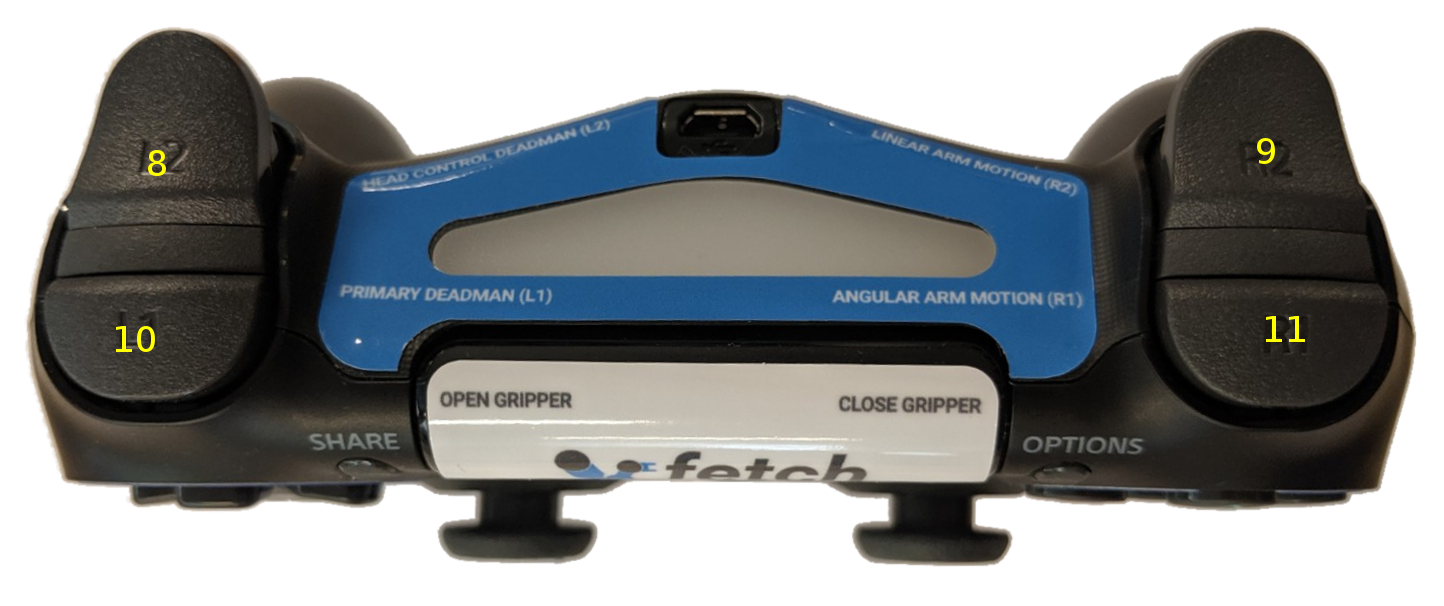
8 |
Head control deadman |
9 |
Linear arm (“tooltip”) control |
10 |
Primary deadman |
11 |
Angular arm (“tooltip”) control |
12 |
Torso up |
13 |
Not used |
14 |
Torso down |
15 |
Not used |
16 |
Pair/unpair with robot |
To pair the controller with the robot, press the middle button (16) once the robot has powered on. The controller will vibrate once successful. To unpair, hold the button for 10 s. The LED indicator on top will turn off.
To drive the robot base, hold the primary deadman button (button 10 above) and use the two joysticks. The left joystick controls turning velocity while the right joystick controls forward velocity.
Warning
Whenever driving the robot, always lower the torso and tuck the arm to avoid potentially unstable operation.
To control the head, release the primary deadman and hold the head deadman (button 8). The left joystick now controls head pan while the right joystick controls head tilt.
To move the torso up, hold the primary deadman and press the triangle button (12). To move the torso down, hold the primary deadman and press the X (14).
To close the gripper, hold the primary deadman and press the close button (3). To open, hold the primary deadman and press the open button (0).
The Fetch arm/gripper can be teleoped by combining several inputs:
Linear motion of the end effector: Primary deadman + Button 9 + joystick input
Angular motion of the end effector: Primary deadman + Button 11 + joystick input
Some controllers, such as the arm and head controllers, will attempt to hold position indefinitely. Sometimes this is not desired. Holding button (4) for 1 second will stop all controllers except the base controller and the arm gravity compensation.
Moving the Base with your Keyboard
Note
You will need a computer with ROS installed to properly communicate with the robot. Please consult the ROS Wiki for more information. We strongly suggest an Ubuntu machine with ROS Melodic installed.
To teleoperate the robot base in simulation, we recommend
using the teleop_twist_keyboard.py script from
teleop_twist_keyboard
package.
>$ export ROS_MASTER_URI=http://<robot_name_or_ip>:11311
>$ rosrun teleop_twist_keyboard teleop_twist_keyboard.py
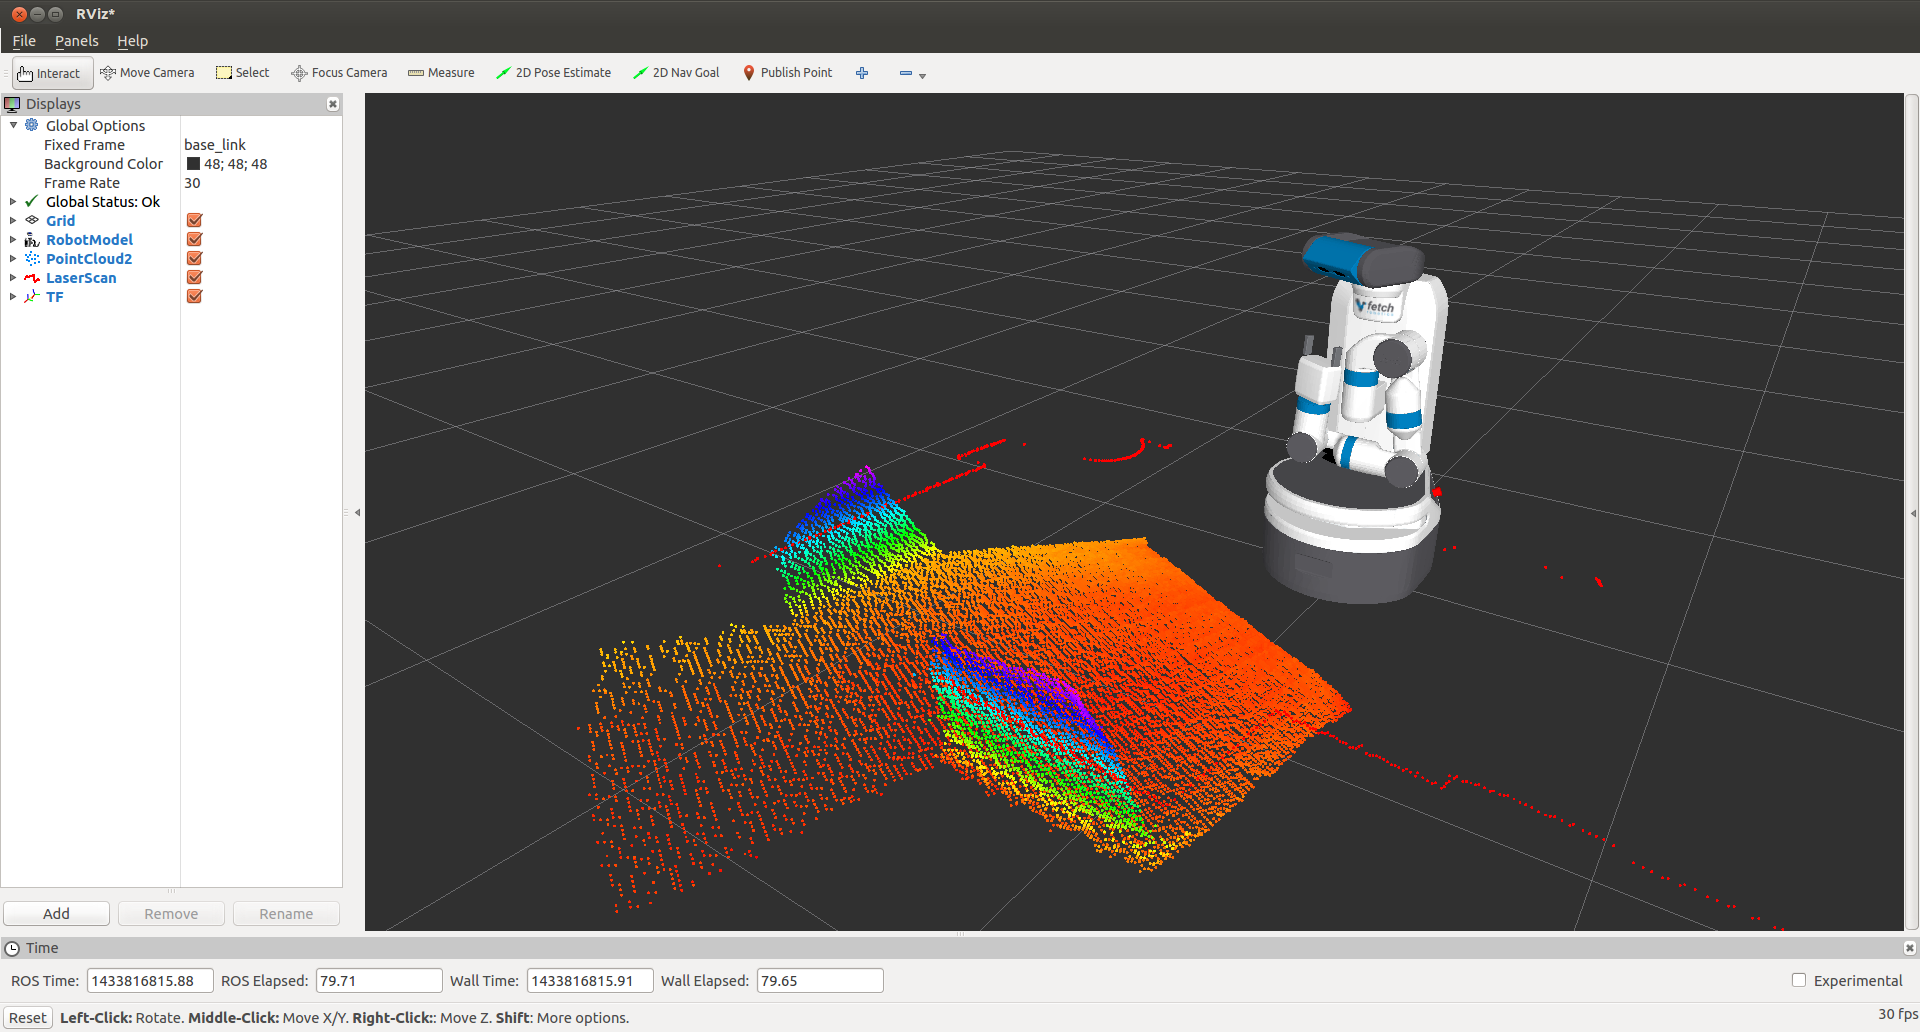
Visualizing Data
>$ export ROS_MASTER_URI=http://<robot_name_or_ip>:11311
>$ rosrun rviz rviz
Note
You will need a computer with ROS installed to properly communicate with the robot. Please consult the ROS Wiki for more information. We strongly suggest an Ubuntu machine with ROS Melodic installed.
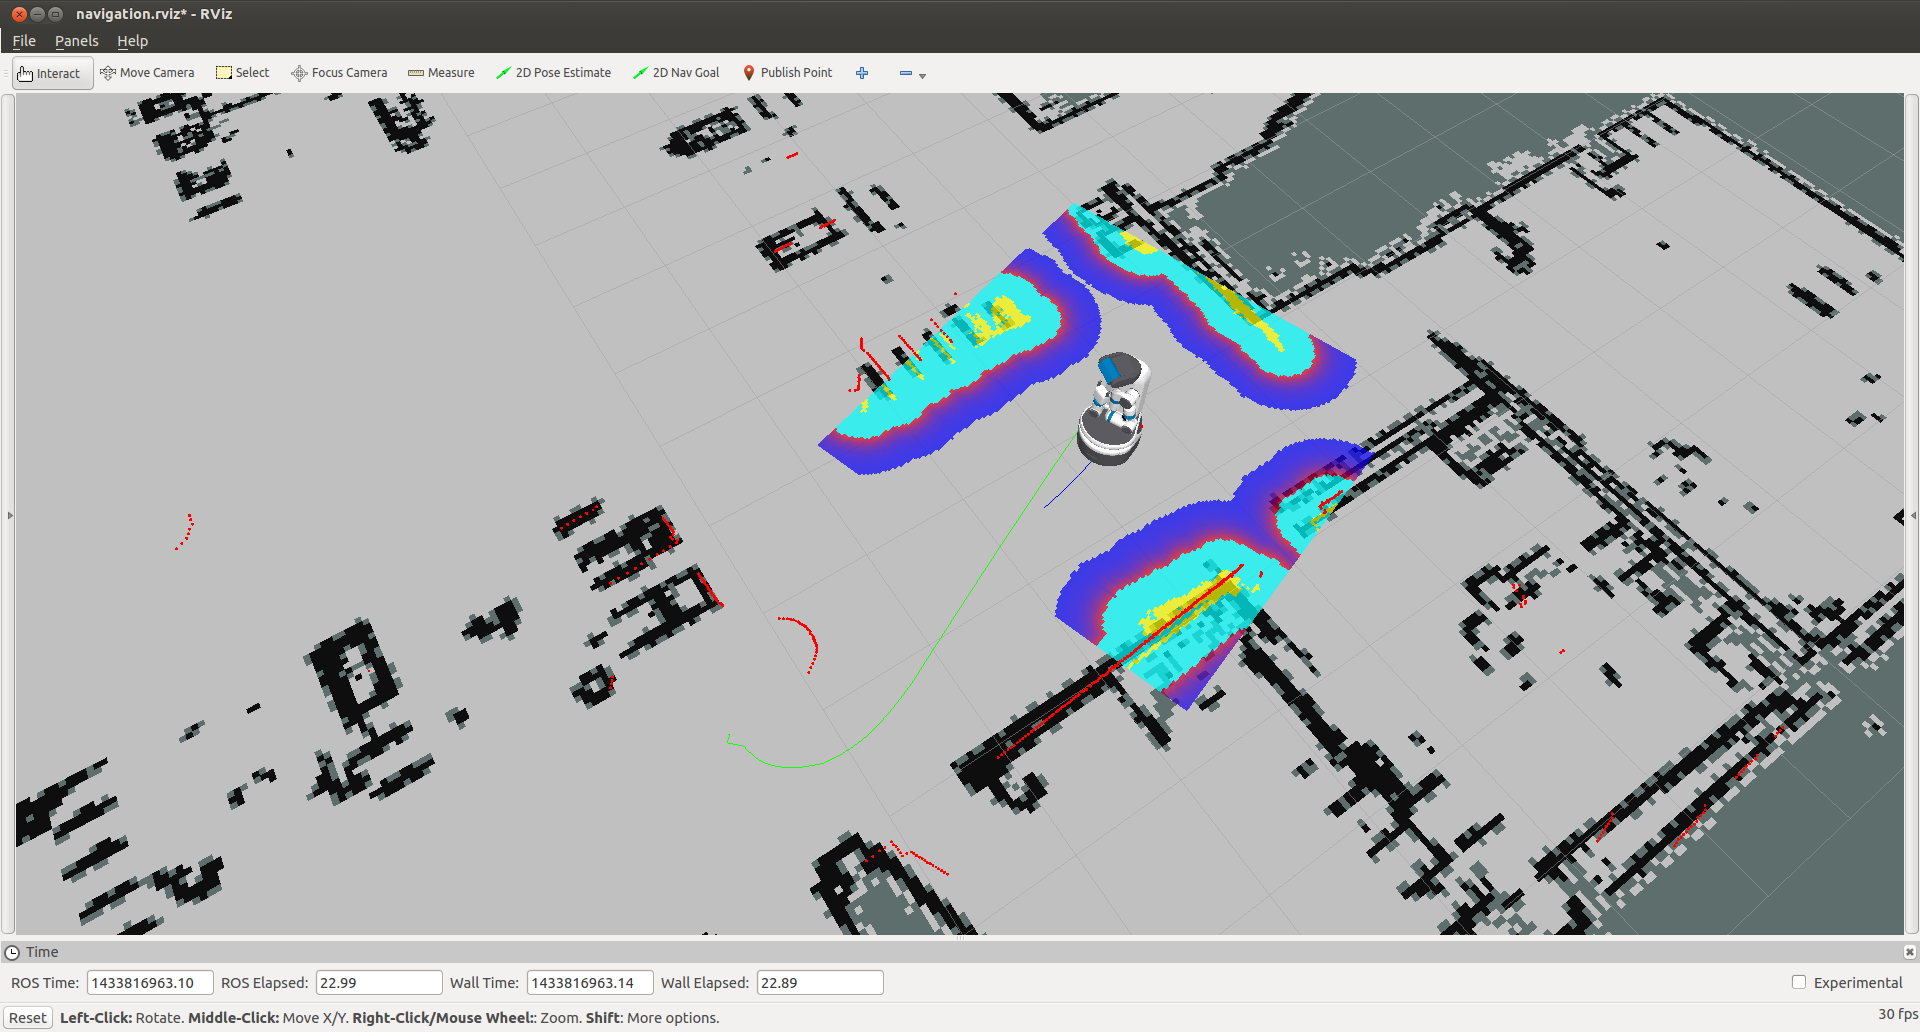
You can now manually set up your RVIZ visualization
or re-run RVIZ with a configuration file using the command line.
The default .rviz configuration file for Fetch can be loaded using:
>$ roscd fetch_navigation/config
>$ export ROS_MASTER_URI=http://<robot_name_or_ip>:11311
>$ rviz -d navigation.rviz
Using the Runtime Monitor
Fetch and Freight publish ROS diagnostics messages. These are human-readable
messages that inform users of the robot system state. The runtime_monitor,
part of rqt_robot_plugins can be used to view diagnostics from your
desktop computer:
>$ export ROS_MASTER_URI=http://<robot_name_or_ip>:11311
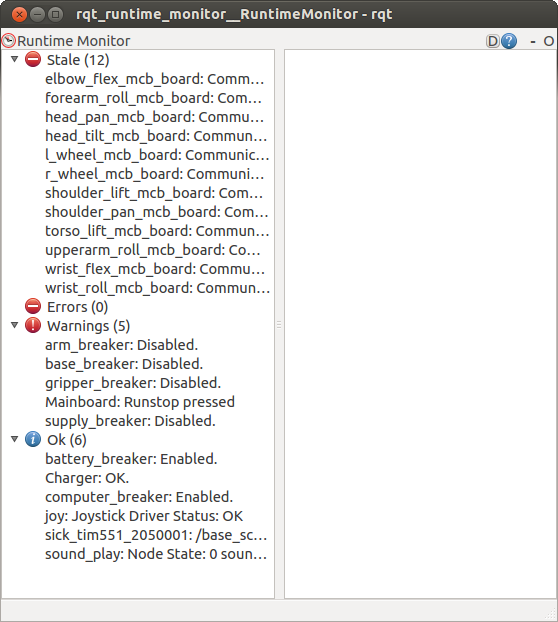
>$ rosrun rqt_runtime_monitor rqt_runtime_monitor
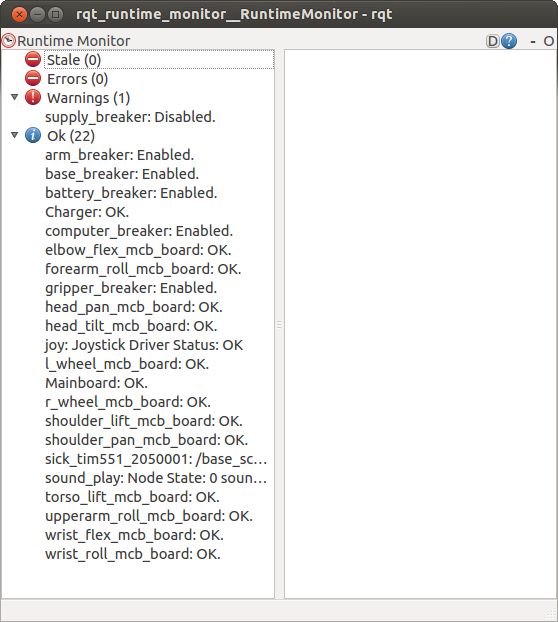
The runtime monitor will have one entry per motor controller board (MCB), as well as one entry per breaker. Each of these entries will be classified as either stale, an error, a warning, or OK. In the above image, the supply_breaker is disabled because the robot is not plugged in – this is only a warning, and not actually an issue.
Common errors that can be detected are overly hot motors or breakers, breakers that have tripped. When the runstop on Fetch is pressed, a number of breakers become disabled and the motor controller boards are turned off, causing them to go stale. The below image shows what a runstopped Fetch might look like:
Putting Fetch and Freight Away
Before turning the robot off, it is recommended that you tuck the arm. When power is shut off, the arm will want to slowly fall and will be more difficult to backdrive when in the off configuration.
To turn the robot off, press and hold the illuminated power button on the access panel until it starts blinking. The power button will continue blinking until the computer has successfully shut down, and then power will be disconnected.